Monday 16 December 2019

Caps: At some point, we have all done it wrong...

Caps are one of those things that make or break an outfit. They are the easiest to fix, and yet, at some point, many of us have gotten things horribly wrong.
My mum at Louisbourg in 2013, bless her soul, I hated that cap.
See, even I have made some horrible mistakes. I dressed my mum in a hurry for this event, without having time for a fitting, and the cap was made in the car on the way to Louisbourg. It was a horrible style, made of too heavy a linen, and she wore it so that it swallowed her face. I hated that cap, and as soon as we were home again...actually as we were packing up, it went into the fire.

Figuring out what style of cap to make means doing some research...really, lots of research. Cap styles change dramatically over the course of the 18th and into the 19th centuries. As a friend recently said, caps are one of those things that can update an outfit in a heartbeat. They were simple and fairly inexpensive to make, and could be done up fairly quickly and easily with a bit of skill with a needle and thread. You might not be able to afford a new gown, but there's usually enough scrap to cut a new cap.


Kitchen Maid, Chardin mid century
An early layering of two styles of linen cap, a frilled under cap, with a plain lappet bonnet worn over.


Margaret Styles Manning 1770
 Two similar styles of cap to the one Mrs. Manning is wearing above, all late 18th century, but worn by a variety of women.
two servants late 18thC
Another style of cap, worn to frame the face, not to swallow it, and of a fine cloth that you can imagine you could see through.

The point I am trying to make here is that too often, we try to cover up our modern hair by wearing caps far too forward on the head. Modern cloth names have confused fine cotton muslin with heavy cotton broadcloth, so we buy cloth that is far too heavy for cap making. I wear my hair fairly short most times, but the thing I have done is to grow out my fringe so that I can pull the front of my hair back out of my face. I have made the investment of fine cottons and linens to make caps with, even going to the extreme of cutting up a second hand, thrifted linen shirt that was a good weight for cap making. And, I have changed my cap styles to be the 'common dog' of cap styles. I now wear a lappet cap like the three grouped images above, and another style closer to the portrait of the two servants. The choice of which one to wear comes from how much of my own hair I have to deal with, and which outside hat I want to wear, but also what I am going to be doing throughout the day, and what I am wearing for a gown.
me, in my lappet cap
in a frilled cap similar to the servant girl's cap, worn over big hair in back


When I moved into the early 19th century for a job interview and an upcoming event, I knew that I would have to make some new caps to go with the new wardrobe. My caps from the 18th century just wouldn't work.
This image seems to me to have the feeling of combining the two styles above. It frames the face, but also covers the hair. This was a good look for what I wanted to do, and so I pulled together a bunch of images of extant caps to work from.
my pinterest page is full of similar styles of caps
A cap similar to the lappet cap from the 18thC, which could tie under the chin, with lots of flouf.
My interpretation, leaning towards the mid to late 18-teens

test run
So I seem to have gotten the front of this cap fairly decent. I am framing my face with the cap, nice bit of room for my curls at the front, fits the nape of my neck nicely. You can see though, that the back needs some help. Either I have to make the caul smaller, or add to my hair with some rats (or both). Yesterday, we went out and bought a hair piece (a rat), and I will try that out with the cap to see how things work out. I am close, and far happier with the results than I imagined.

The cap itself is made from materials gifted to me from a friend, fine cotton mull and a bit of hand-made bobbin lace that was 'just enough' for the frill.

I should be able to wrangle a kitchen well enough in this style, not having to worry about it shifting on my head at all. Hopefully my sausage curls will stay nice and tight. Modern hair shellac might be deployed for the day of, just to be on the safe side. My hair is cut fairly short, at chin length these days, but if I decide to go shorter next cut, I could still rock out a historically correct hair style by keeping the front fringe forward and curled to within an inch of its life. I'll have to deal with that caul though...

Saturday 30 November 2019

Regency on a stoestring, but also the historical stash busting challenge...

The last week or so, I have been working on Pierre's clothes for the dance at Red Hook in February. From the stash, I pulled out a piece of navy wool twill that the tag said I paid 5.65$/metre for. I remember buying it, humming over it, thinking I didn't need any more fabric, but my friend Jenny telling me I couldn't go wrong with having a good navy wool in my stash...most men like wearing navy.
At that price too...

So I cut new high waisted trousers for Pierre and got those made up. (I still have a good chunk of it left)
The only construction shot I seem to have taken...
Then I went to the tickle trunk of old garb pieces and pulled out a regency era waistcoat that Garth left for me to do something with. I have always been in love with the cloth, it is a fabulous rust coloured wool with a blue pinstripe. The waistcoat construction left quite a bit to be desired though. The person who stitched it didn't do a bad job, per se, but didn't understand the fine points of historical sewing or tailoring. So, I set to it with a seam ripper and carefully unpicked every last bit of it.
And yes, I should have probably taken a before shot, but I've been bad at that...
The collar was easy, remove the iron on interfacing, re-block the wool with the iron, find a piece of linen from the scrap box big enough for a collar, find a piece of canvas from same scrap box to cut same, re-build collar properly. The guts literally came from the scrap box, not from new cloth.
Next up, I tackled the pockets. The original pocket bag was put in more like a facing around an opening and would never lay flat, the welt itself was top stitched in place by machine. Thankfully the pocket opening wasn't cut too big for the welt though, so once everything was unpicked and re-blocked, the pocket went back together quite easily using the correct method. The welt itself is a bit wonky, but I'm looking at it now as having more heritage. The new pocket bags also came from the scrap box, still no new cloth cut.

Once the pockets were re-built, I interlined the waistcoats fronts with a small leftover piece of red cotton broadcloth as my canvas. I didn't need the qualities of hair canvas for this, since I wouldn't be rolling a lapel or anything, I just needed a good bit of cloth to support the wool. Since I rarely prewash my fabrics, the broadcloth still has its sizing, so was nice and crisp. And there was 'just enough' for a couple of waistcoat fronts.

The lining and backs came from new cut cloth, my dwindling stock of lining linen. Plain, unbleached, and unwashed, so nice and crisp. This waistcoat will never see a laundry tub, so there's absolutely no need to launder any of the fabrics for shrinkage. Tailored garments should never be washed...brushed, hung to air, if absolutely need be, a trip to the dry cleaner, but only as last resort. 

Once the waistcoat was back to waistcoat form, I needed buttons. This was the only piece left to create self covered buttons with, and I did not want to order metal buttons...cloth covered may be a pain in the hands, but honestly, they were the common dog of buttons in the era, so I suck it up and cover buttons.
This is the little circles cut for button covering, the button molds are bone gaiter buttons from my stash (yes, I have a metric tonne of gaiter buttons, my grandfather kept all the dead buttons, just in case), and ALL THAT'S LEFT OF THE WOOL! Seriously, that's really all the remains of the old waistcoat. I had to cut the buttonhole placket off as the original buttonholes were put in vertical instead of horizontal. The wool for the buttons came from what remained of that off-cut piece. 

Since I didn't even want to run to the fabric store for thread this week, I used another trick from the bag and blended two thread colours to give me a 'close enough' colour for the new buttonholes.
The buttonhole was whipped around closely with a brown sewing thread. Then, I worked the buttonhole stitch in a dark red twist. The two colours together work fairly well on the rust coloured wool.
Last weekend, while on a drop off to the second hand shop, I had the thought of going in and seeing what sort of hat I could find to re-work into something for this suit. I came out with a gnarly old porkpie that was destined for the tip, for sure, due to it being in such rough shape. When we got home, I threw it in a hot wash with some soap, not really minding if it would felt up any...because seriously, it was in bad shape, and I paid so little for it. Once washed, it was pulled on to a hat block I made years ago from Styrofoam and left to dry. Once dry, it got a couple sprays of shellac and set to dry again before finishing.
It was finished with a length of green twill tape, likely from my days at the Citadel, like close to 20 years ago, and a small mother of pearl buckle from the stash, possibly from the 1940s, but a great colour. The nappy spot on the side of the hat are actual holes. Pierre wants to keep them, even though I could needle felt some more wool in to repair them. The lining came from the scrap bin again, and is pieced...
I marked the circle piece with his name in black ink, just 'cause.


Pierre's coat will come soon, made from cloth from the stash again, but in yet another wool...so no pieces will match at all. He will be a tecnicolour man of the lower sorts. We are likely to be in the kitchen, and would be of the lower sort anyway. I will take photos of the finished outfit when it's all said and done...

But first, our dance master needs clothes, so I am on to that.


Tuesday 12 November 2019

a long, drawn out exercise in costume design research

This degree boils down to me wondering how we can make a better effort in how we look at living history events in Nova Scotia. Since clothing is always the first impression a person gives to the world, it's doubly important to get that correct when doing living history. The visitor to your site may never enter into conversation with an interpreter, they may simply come to see, to watch. So what can we do when preparing for the next event? Make sure we have the details of our clothing and accoutrements as correct as we can get them.

This means constantly researching, constantly striving to improve.

If you have been following me for any length of time, you'll know I am taking this opportunity to completely overhaul our kit. This was mainly begun due to the simple fact that neither Pierre nor I had a whole lot of clothing and personal material culture to begin with. Up until now, it has been my job to dress other people, so if we went to an event, we were the last dressed, often badly, with me usually still sewing the night before. Now, I have the opportunity to sit down and take the time to do what I have long wanted to do, really think about how we should look. I have been wanting to build a new suit of clothes for Pierre for a while. I thought about our ancestor, Peter Grant, the man who received the original land grant in Pine Tree. What would he have looked like? He may have worn a kilt during the war as part of his uniform, but afterwards, several of my research nerd friends and I figured breeches were still the common nether-garment of choice.

 The project started with a piece of fabric pulled from the scrap bin at NSCAD that was big enough for waistcoat fronts. They were cut, and tucked into a big Ziploc bag for later, along with the scraps. Then I started collecting the other fabrics I would need, and thought about how I would like him to look. The left-over bits of a suit I made for myself last Fall provided the fabric for his new frock coat/jacket. Then my brother and I going through a box of family heritage revealed a MacKay tartan kilt of my dad's that could be cut up and made into something else, since it was seriously moth eaten, and useless now as a kilt.
Neil Gow, by William Say (1773-1857), after Sir Henry Raeburn. Published by T. MacDonald, 1815, 213/4 x 15 7/8inches
I had been thinking of this painting of Neil Gow for a while. His jacket and waistcoat are of an earlier fashion, more 1770s than 18-teens, but also the tartan breeches and cut cloth hose (a challenge!). I had all the fabrics now to complete this suit for Pierre. And I had the time, between contracts and dissertation edits.

The almost finished suit! I have some minor tweaks to tidy up, I cut his breeches waistband far too big, and those bubbles in the sleeve head need to be steamed out, but otherwise, this suit is finished. His waistcoat is a classic 1770s cut, lined and backed in natural linen, buttons are self fabric covered, working pockets. The coat is based on one in the Glasgow Museum and a Continental jacket pattern developed by Fort Ticonderoga. I wanted a working mariner's cuff, and so used the Glasgow museum jacket for that reference, and the cut of the jacket, pocket placement, and collar came from the Ticonderoga pattern. The breeches are a standard fall front style, but I didn't use fall plackets, choosing to have a clean line of sett across the front. The breeches are completely lined in linen to provide stability to the wool, but also to hide any small moth holes in the cloth. The hose are single layer of bias cut tartan.

Once I have made the final tweaks to the suit, Pierre can have it to wear, break in and gain some heritage. Then it will truly become his, as his body warmth will allow the wool to stretch to mold to his body. Then, the pulling at the front button won't happen. I can't make the man not stand at attention-at ease though, he is after-all, a military man. His clothes will become more his though, through wearing.

No new fabrics were used in this suit, all came from repurposed or leftover cabbage from other projects, including linings. Even his hat was re-shaped from a slouch felt he wore after SCA tournements, and was in seriously rough shape. In fact, the only new piece of clothing in this image is a new neckerchief, which is mine, a gift from a friend. Though I do like that pop of red.

What might Peter Grant have looked like? I think he might have looked like this...though perhaps with red hair.

Friday 11 October 2019

#historicalstashbustingchallenge

Sandby 1752
Who's in?

Winter months are usually for building new kit. This year, I will attempt to only use fabrics from my 'well curated collection', ie. The Stash! Honestly, it's been stressing me out a bit. Once the stash gets to the point where I am questioning my ability to get it all sewn up before I die, I start getting antsy.

So before season opening, May 1st weekend, I challenge myself to only use fabrics from the stash, the only thing I am allowed to buy is thread. I will post photos with this hashtag. The Regency on a Shoestring is part of this. I'll be getting back to that shortly too.

Tuesday 1 October 2019

Yes, the Amish are (somewhat) Fashionable

It has been a crutch at most living history sites in Canada, to order Amish menswear for their interpreters rather than making them proper, historical clothing. After all, the Amish wear old fashioned clothes, who's going to notice the difference?
What may look "old fashion" to most people isn't as old as one might think. Look closely, and you may actually see that they are really rather fashionable - vintage maybe, but not so "old" as you'd think. The current trend in Amish women's wear sits mid 1970s, Laura Ashley style.

Yes, only that old.

Not even as old as I am, as I wore similar cut dresses as fashion when I was in high school and early undergrad.

Men's wear may be a touch older...1950s at most, if you had altered the trouser style from a pre-war bagginess, to more of a stove pipe cut leg width. The waistcoats and collarless shirts are also mid 20th century at most. The 'barn jacket' pictured above, is completely a Nehru jacket circa 1965!

Sites need to step up and stop using that crutch of "we've always done it this way", and "it's more comfortable". If we can't dress our interpreters correctly, what else about history are we getting wrong?

Monday 23 September 2019

what is Work?


The focus on most of my research is what many today would call 'women's work'. The domestic arts. Even though, for centuries, men were tailors, a lot of the sewing work was done by women. Women were paid less for the same amount of time, and many women were as good or better at stitching that their male counterparts. The majority of my work is on stitching techniques, but also cut (the masculine side of my trade). I am a fit and detail person. I am not a decorative person. In the period, I may have been able to find a husband who would run the business, and I would do the work.

And, I would likely have done the work.

Today, I work on creating garments for people, I knit stockings, and I am writing a dissertation on eighteenth-century clothing and personal material culture. I think a lot on how things would have been made, and by whom, and how to make those things as proficiently, and efficiently as possible.

Sometimes I even get paid.

I say sometimes, because I am not a fully funded academic. I am not paid to think about things as academics were in the past. Institutions do not fully fund their graduate and PhD students like they once did. We struggle with wondering if our work is a valuable contribution, or is that load of laundry a bigger contribution to the overall well being of our families.

When I think on life, there's not much of the day where I would be considered 'not' working. And yet, because I do not receive a salary, cannot contribute financially to the family, my research, or the economy, is my 'work' actually valid?

Things I think about on a now much cooler, rainy day. Knitting stockings for a living historian, and trying to think about how to efficiently make these things that we all need so that I might earn a bit of actual money.

I think academia has also become 'women's work'.

Tuesday 17 September 2019

Living History 101: One persona will not fit every event

When I played in the SCA, it was fun and easy. I picked a character to play, made some clothes, and went to events. The Society is really relaxed about things, a European, between 600 and 1600, or a person who would have been in Europe during that time period...but even then, people push envelopes, and the requirement for dressing is a 'plausible attempt'. So, there are women of Elizabeth's Court who wear poly cotton T-tunics and nobody bats an eye. Nobody really cares, it's a closed event, for fun!

When you do living history, it's a whole different ball game. Historic sites 'hire' you for the day or weekend to portray a specific character in a specific moment in time. There is not 'plausible attempt', it's all-in or nothing, please. Most living historians have a whole wardrobe of clothing and accoutrements to suit several different months, years, and characters over a given period of time. Some living historians do several different periods in time, and so have several different closets of clothing and bits to pull from. They are essentially a theatre costume shop to go. And a lot of them can stand scrutiny of a microscopic level.

When applying to attend an event, I need to know the date the event is recreating, but also the culture, and what the site needs from me as an actor in their drama. Would I even be there? A woman of a certain age? Do they only need men, only soldiers? If women are there, what would they be doing? Am I just 'stock background character, displaced person circa 1774'? or am I actually going to have a job to do, 'Scottish servant woman, circa 1758'?

 It is not just what I will get out of the event, but what the event needs from me.

Actually it's all about what the event needs from me.

There are events, that while fun to be at, didn't hold my thoughts for long. I have come to realize I like having a job to do, I like working my butt off. I get bored being a background character. Thoughts run to scenes in movies where you see the same actor running back and forth down various streets in Louisbourg...I'm looking at you Gabe ;-)
It's cool if I can just hop in the car and go hang out for the afternoon and meet up with my friends for supper and be home in time for bed. But most events for us are still hours away. It's just not feasible for us to drive five hours, spend the night in a hotel, for 45 minutes of interp, then drive five hours home.
AND THAT'S OK! Again, the event is not for me.

The 250th commemorations are beginning next year, there are going to be some cool events happening, but they won't all be for me, or my wardrobe. I will be looking at each individual event, and their requirements before applying. Sometimes, if I want to participate, it may mean making new kit for Pierre and I, maybe even from the skin out. And I am cool with that.

and with that, before our next Ticonderoga event, I need to tie up my gown skirts and make a new petticoat...running up and down stairs in floor length skirts is hazardous to my well being.

Tuesday 10 September 2019

Once more into the breeches

this week, I have started working on a black broadcloth suit for a vicar in the local regency era group. I love making breeches, honestly. But, there are many of you out there who hate the process. I have come to realize that a lot of that hate is from trying to make breeches by machine. Asking the machine to do things regency and eighteenth-century breeches had never dreamed of doing.

In short, there are different processes to sewing in the machine era and the pre-machine era.

Ok, So how do I start making breeches?

I start by stitching the centre front seams on both the fashion layer and the lining. This you can do by machine. Then I press the seam allowances open.

Next, I press under the top edges of the fall on both the fashion layer and the lining. I place the two pieces together, wrong sides together, with the lining just a hair shy of the top edge. Then, BY HAND, I fell the lining to the fashion layer of the fall. This nails the edge in place and creates that beautiful little 'top' stitch that you see on the edges of hand stitched garments. It can only be achieved by doing it by hand, since it is so close to the edge. If you were to achieve this same 'nailing down' of the seam, preventing the seam from rolling, you would in effect, have to do the seam three times instead of one. You would stitch the seam, right sides together. Then, you would edge stitch all the seam allowances to the lining. Then you would top stitch the whole mess. This machine method is not the greatest, and believe it or not, is also not the fastest. I have tested the theory, and found that I can accomplish a better seam by hand in a quicker amount of time.
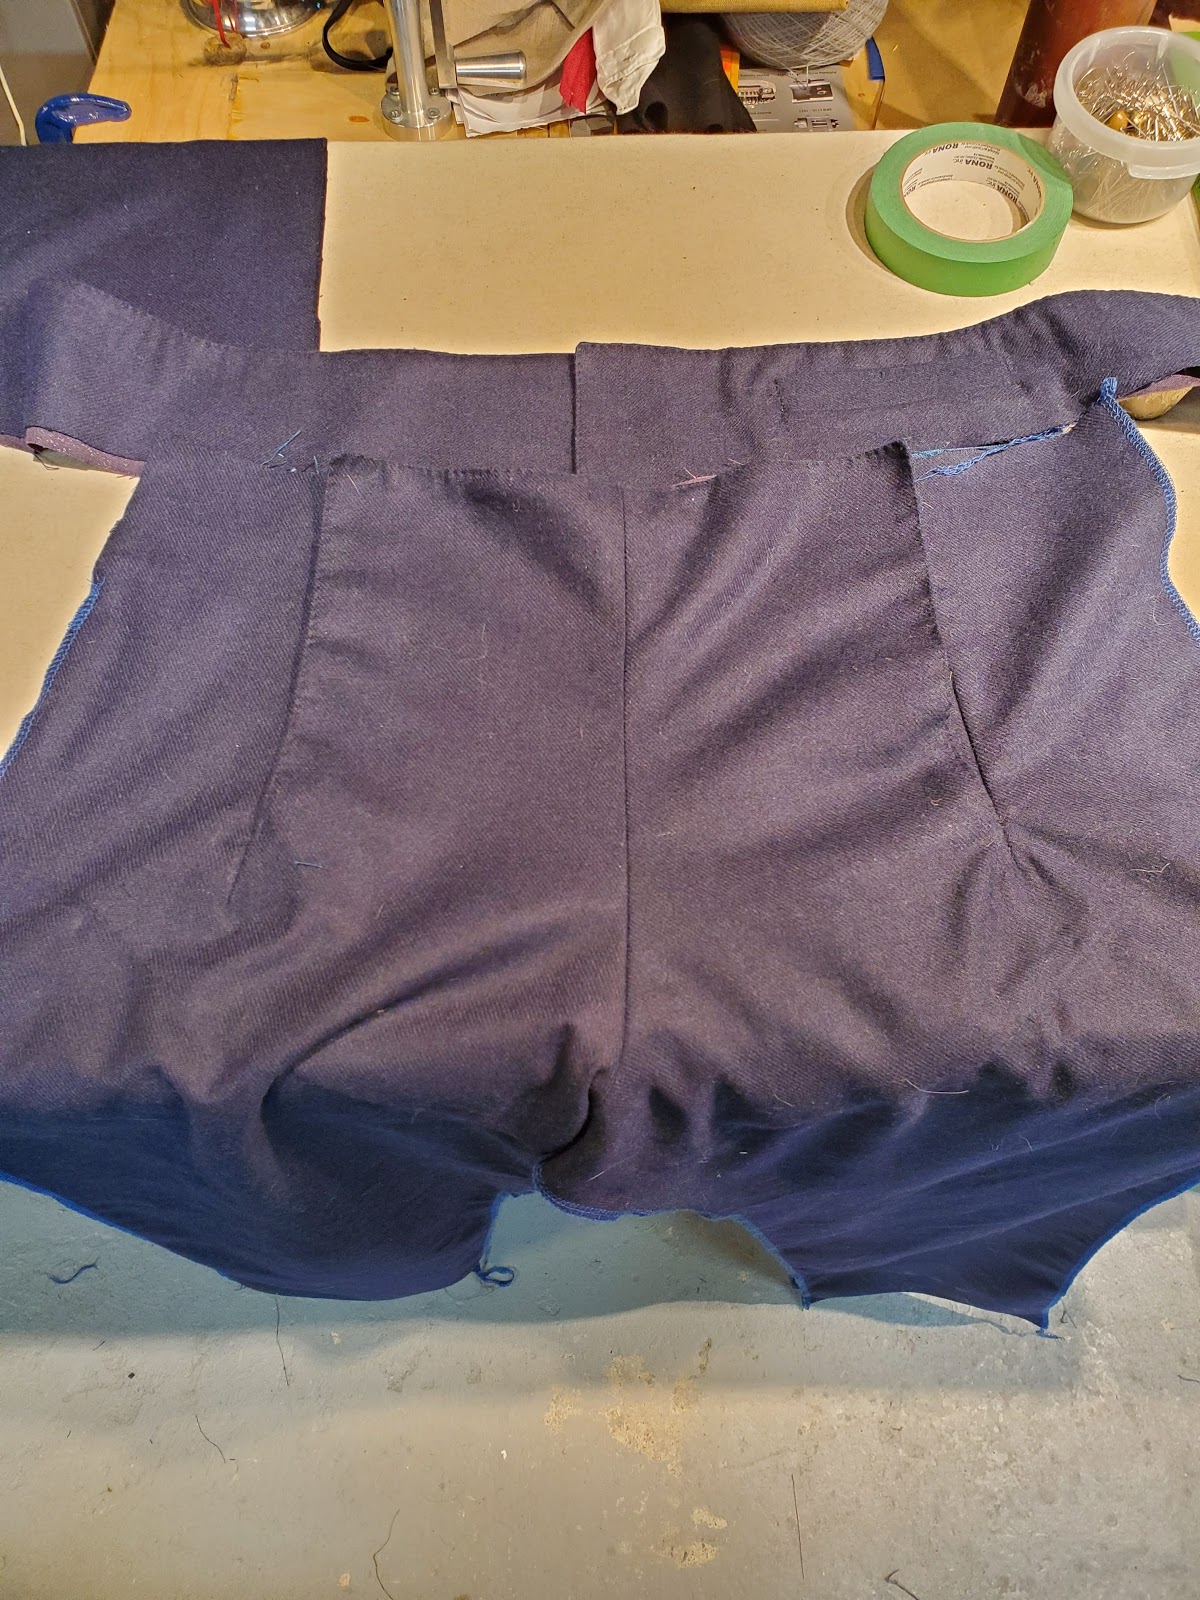
Top of the finished fall, right side. Notice the sides of the fall have not been cut yet.
I then baste the sides of the fall and lining together, and then with a small running stitch, I stitch the lining in place through the crotch. The edges of the lining are turned under a scarce 1/4" through the crotch, but left raw along the sides of the fall, since they will be encased in the fall placket.

I still haven't cut the sides of the Fall.

Next, I press the fall plackets into shape. It's important to press them properly so that stitching them will be easier. Trust me here. I will say it until I am blue in the face, the steam iron is the most important tool in the sewing room.


You'll also notice, that I stitched up the top edge of the fall placket. I did that part by machine, and pressed the seam allowance open, trimmed my seam allowances, and then pressed the whole thing flat. These are all well pressed and ready to go.

Next up, I stitch the curved seam of the front bearers, those bits that hang out inside the fall for modesty. I baste-stitch the curve by machine, and then roll and press the lining to the wrong side. Then, I fell the two pieces together. I baste by machine, right sides together, then turn and press, because I can achieve a nicer curve this way then by just pressing the curve under.


I am not quite ready to cut the sides of the fall...

Right sides together, I stitch, by hand, the placket edge to the fall edge. At the bottom of the seam, I knot-off, but do not cut my thread. Then I cut the sides of my fall. I then stitch the bottom point of the placket into place, wrong sides together, using a little slip stitch. Once I have gotten to the other side of the point, I turn the work to the wrong side, and slip stitch the bottom of the backside of the placket in place, and then up the remaining side of the placket, encapsulating all the raw edges of the side of the fall. The whole process is done with a single length of thread, and one continuous seam. 

You just cannot do this process by machine as easily.
After the fall is nicely finished and pressed. I stitch the bearers in place, also by hand, starting off with right sides together, then at the bottom of the seam edge, I turn and stitch from the back side. I will also slip stitch the bearer to the bottom of the fall placket to secure everything nicely.

There! The hardest part of breeches making is done! At this point, long seams can be done by machine and pressed open.

The second biggest thing people complain about are pockets. in this pair, I am including a waistband welted watch pocket.
My first step is to stitch the welt to the pocketing, and press the seam allowances open. I have done this by machine.
Keeping the welt and pocketing to one side, I stitch the welt to the waistband, following the same stitches as before (between the pins).
on the wrong side, I have marked in chalk where I need to cut the waistband open for the pocket. I am going to cut right up to, but not through the stitching, or past it...this is important. If you cut too short, the welt won't sit properly, if you cut past it, there will be a hole, and you may as well start over again. you cannot fix the hole once it's cut.
At this point, I stitched up the sides of the welt, and pressed everything nicely from the right side. I can double check now, to see what the finished welt will look like. If I have cut the pocket opening too big, there's only one seam to carefully unpick so I can start over again with a wider welt.
Back to the wrong side of the waistband, I have picked up the bottom edge of the pocketing and will stitch it to the other long edge of the pocket opening, between the pins.
I press that seam open, then stitch the sides of the pocketing shut, catching the tiny triangles that form on either side of the pocket opening. I usually stitch my pockets by machine, running back and forth a few times over those triangles to fully support the sides of the pocket opening. I have also serged the sides of the pocketing, since linen frays. I have determined that the side that shows when the breeches are inside out, will be my 'good side' of the serging (yes, there is a good side and a wrong side to serging). Then, taking a darning needle, I have run the ends of the serging stitches up inside the wrong side of the serging. This is a couture/dancewear thing that keeps the serging from ravelling if you have just cut the threads flush. Leave them long, and then run them back through. It takes like 3 extra minutes but makes for a far nicer seam finish.
Ta-da! pocket. I have now stitched the sides of the welt to the waistband itself as well...thus the shadow line.


Finally, the edges of the waistband are pressed under, same with the waistband lining, and the two pieces are felled together. Waistbands finished and ready to be applied to the legs.

A few final notes: Sewing takes time, sewing seams properly, and by hand can sometimes take more time, sometimes less. The iron needs to become your best friend, honestly. Just enjoy the process of making, your garments will look better for it. These breeches took two afternoons to make, and are still in need of buttons, buttonholes, and knee bands...and a fitting in there too. You will not get a quality garment for less than the price of the material cost...even from Asia. 

Be well, make good breeches!


Monday 2 September 2019

Regency on a Shoestring: Living the Federal era life right now

September will be men's wear central at the shoe. I have two suits to make over the next few weeks while Pierre is on course. I have tested out some theories and figure I should have no problems once I get underway.

The first is for a gent over on the island (Montreal). He's slowly getting out of soldering and is looking to style himself as a clergyman. William Booth, draper supplied some lovely wool broadcloth and worsted, and Club Tissue some nice shirt linen. Mrs. Milligan's Haberdashery supplied the cotton mull for throat and wrist ruffles on his shirt. We are going for breeches, waistcoat with standing collar, and a shawl collared, frock coat that is well tailored to skim his torso. A bit conservative in fashion, but there's enough imagery of breeches wearing gents in the period that I am good with it.
French Fashion Plate,1811
Portrait of a Young Man, Francois-Xavier Fabre 1809
The Skater (portrait of William Grant), 1782 (oil on canvas), Stuart, Gilbert (1755-1828) National Gallery of Art, Washington
These are the paintings I am using for inspiration. Yes, they span a bit of time, but I feel like the clergy should be a bit more conservative in dress. I did up a little fashion croquis and Jay was happy with the style. I will likely start cutting this week.

For Pierre, because we are going to be doing some teen-era and later stuff, I wanted to try a bit more fashion forward stuff. Fashion forward, but still practical, given our class level. Currently, we live on the south shore of the Saint Lawrence, in farm country, and I had thought about reproducing the quintessential French Canadian couple...
Canadiens, deuxieme moitie du XVIIIe siecle
I might yet, still, but for now, I want a bit more commonplace look for us. That means more of an American look, with French leanings because he is French after all, but, I want more early 19thC stuff than late 18thC, so the Canadiens will have to wait a bit...though if anyone comes across those perfect fabrics, please let me know!
Habit a Collet de Velours, Gilet de Pique, 1816
I did a test run of his trouser draft last week. I have to take in the legs to a more shapely fashion, the draft I started with was from the 1930s to get the fit through the hips I wanted. They won't be skin tight through the leg though, like I have seen in some artwork, but shaped. I made them up in a heavier linen, which may be wonderful for three season wear, but I will be on the (stash) hunt for some suitable wool for ones he can wear in February. His frock coat will be made up in the cross-barred olive wool that I made a suit for myself out of last Fall, I have just enough left over from that project for a coat. I may do the top collar in navy wool that I have scads of...his winter trousers and waistcoat may also be made out of that navy, we'll see once I get Jay's suit finished and I can get back to the less pressing suit for Pierre. Our next event is in February, so I have a bit of time.

There are noticeable differences between late eighteenth-century tailoring and the early nineteenth-century, most importantly, the collar and lapels. This is where the modern suit jacket starts to take shape, with pad stitched lapels and collar over more flexible hair canvas instead of the stiffer buckram. Wool padding over the front shoulder concave also make s a return from earlier in the eighteenth-century, and the whole garment has more tailoring involved. They end up taking almost twice as long with all that padded work. the m-notch collar is also an interesting bit of construction, best done with well fulled wool that you can cut and not worry about turning. When I made my spencer with it's silk top collar, I had to do some interesting facing work to be able to turn the inside points of the M. Pierre's collar will be wool, well fulled.

There are photos from my regency era gown and spencer project and I will write up a full post on that over the next few days. In the meantime, for quick teasers, follow my Instagram at https://www.instagram.com/kellyarlenegrant/
All of this is working itself towards more formal writing in my dissertation, as I develop construction techniques and supporting photos. I am also currently writing the chapter on how we use all this research to develop better quality living history programs. The shoe is a busy and happening place these days.

Sunday 1 September 2019

Regency on a Shoestring: Caps

Caps, they are something more of us should just be wearing, all of the time. Not only do they keep the sun off the top of our heads, they keep our hair clean and tidy too. I have even taken to wearing a triangle of cloth on my head on the regular day to day life, since wearing my hair up doesn't always mean my hats will fit my noggin'. I hate having my head sunburned.

Unless you are dressing in evening wear, where your hair will also be dressed to suit the fabulous ballgown you are wearing, your head should be covered.

Look at these two lovely ladies wearing caps, the Oyster Girl on the left is even wearing her cap underneath her hat. This keeps her hair from sticking to the interior of her hat and pulling, but also allows the hat something else to purchase on. If you have also done your hair nicely, the cap is nailed to your head, and then the hat can be nailed to both cap and hair nicely with some long pins.

I have found recently, that there is no possible way I can make caps for folks that are within a price range people are willing to pay. My latest cap literally took as long to make as my gown did. So many little hems and tiny seams. They should be something that every lady makes for herself though, since the sewing is simple, if repetitive.

Cutting: measure your head from ear to ear, over the top. Then from where you want the caul to sit, towards the back of your head...don't forget to add enough space for your hair if you use extra bits at all...I do, as I have baby fine hair. I actually stuff the back of my head with C-clip hair rollers to give it enough volumn. Cut a rectangle this size, and round off the top two longways corners. There, you have a caul.
Now, the front of the cap is usually a lappet style in this period, that's what I think the Oyster Girl is wearing above, since the frill comes under her chin. This is cut by making the front long side the length of the measure of around your face, chin to top of head, and back to chin. The parallel, back line of this section is usually from earlobe to earlobe, over the top of my head. Sometimes this has a section that curves around to the back of the nape.

Let's look at some caps...
Museum of Fine Art, Boston*

Museum of Fine Art, Boston*

Met Museum, New York*

Museum of Fine Art, Boston*
 All these caps are seemingly fancy-pants caps. A lot of people think they are for upper class folks, but if you look at the shapes, and not the fancy lace, you can make a similar style of cap, but for a more lower-class persona. What is available to you in your local fabric store? Can you obtain small amounts of batiste or mull, fine shirting fabrics? Use these for your caps, and save the lace for the upper class personas. Most laces available from your local Fabricland and Fabricville stores are not appropriate for this period, it being heavy crochet lace, and not this fine netting style of lace.
Museum of Fine Art, Boston*
 Look at the simplicity of this cap though, cut in one piece, just a large rectangle that has been cut into and  gathered into the back neck, edged in a very small lace. This is likely a simple batiste.
Museum of Fine Art, Boston*
 And here we have another very simplistic cap in fine cotton mull, without any lace at all!

Sewing caps: You need to know how to make tiny hems, since almost every piece of the cap will be hemmed before you put the pieces together. I do a little whipped rolled hem, by folding the edge over as slightly as I can one time, then picking up a couple of threads where the cut edge meets the body, and then a couple of threads right on the fold, making little 7s with my thread. After about 8 or 10 stitches, I pull up the thread to roll the hem. For any felled seams, I use a simple running stitch to sew the first leg of the seam, and then after folding the fell over, a pick stitch. Using tiny sewing needles and silk thread, I am able to achieve tiny stitches. Get used to using small needles and a thimble, and your sewing will improve. I have stronger strength glasses just for hand sewing.

My last note is about reenacting clothing. Far too often I have seen women making their caps from heavier linen or worse, poly cotton blend broadcloth. I just have not found any extant pieces from this period in a heavy linen...and let's face it, poly cotton may be cheap, but it is not at all historically accurate. The amount of material required for a cap is so small, everyone in this hobby/profession can afford to purchase enough to make a cap. All you really need is less than a half metre, and really, you are likely to be able to cut a couple of caps from a half metre. If you want a stiffened cap (which is the excuse some have given for using poly/cotton), boiling in starch will give you the best results. And it's period!

My caps are one of those items of clothing that hardly ever get laundered...I want the heritage of a few days of wear, so really only launder them when they are pretty darned nasty. This takes a long time to occur though, since I starch my caps and the starch repels the dirt like nobody's business.

*working on accession numbers for these caps...Pinterest can be your friend for quick searches, but a lot of people pin without information. I am working to rectify the situation on my own Pinterest boards.
https://www.pinterest.ca/esteladufrayse/regency/
https://www.pinterest.ca/esteladufrayse/regency-footwear/
https://www.pinterest.ca/esteladufrayse/1820-30-ross-farm/