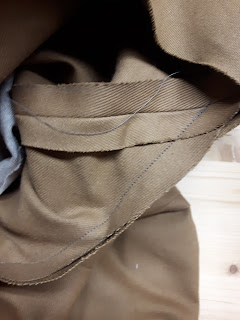
 This is two rows of machine stitching at the longest stitch length. The first row is just to the seam allowance side of your final stitching line when you set the sleeve, the second is 1/4" inwards from the first, towards the seam allowance.
The second step,
Is to pin the bottom curves of the armscye to the sleeve's bottom curve. It should be fairly straight forward to match up the bottom curve of the armscye to the bottom curve of the sleeve. They should appear to be remarkably similar in contour. You might want to even stitch this curve in, between the start and finish of the ease stitching. Only stitch the bottom curve, and be careful not to catch your easing stitches when you sew.
Next, The easing stitches are pulled up just until you get a rounding to the top of the sleeve head. There shouldn't be any real gathers or pleats, only a little bubbling and a nice rounding to the sleeve head. Like this...
 |
| see the nice rounding to the top of the sleeve head? You want this rounding in your finished sleeve. |
Stitch this remaining section into place. When sewing by machine, I follow the first row of ease stitching for my final seam. I also make a little pulling motion to either side of the seam with my fingers to help calm the bubbles. This pulling is not fore and aft of the pressure foot, but perpendicular to the seam itself, in front of the pressure foot. Be careful not to sew your fingers.
Depending on where your shoulder bone sits on your body, you can often move this fullness forward or towards the back of the sleeve head to accommodate the fullness of that shoulder bone. If you do not account for any ease in the shoulder, especially in historically cut coats, the sleeve will actually pull the body of the coat off your body, as you haven't given your arm enough room in the sleeve head. A horizontal crease in the top half of the sleeve itself can also often be fixed by narrowing the shoulder line of the coat body itself, but still allowing for ease in the sleeve head.
If you have a lining, bring that up now. Be careful to not make it too short for the sleeve. You can even tack the seam allowances of the sleeve and it's lining together at the top back arm. Fold under the armscye seam allowance of the sleeve lining and cover the raw seam allowances of the coat body and sleeve. Whip stitch around the armscye to encase the raw edges. This to me is the sexiest stitching in tailoring, next to a fabulous hand worked buttonhole.
And the finished sleeve... |
| body of mannikin is not the body of a Pierre, and so the underarm is collapsing just a bit. |


Thank you for the disclaimer on the last picture.
ReplyDelete