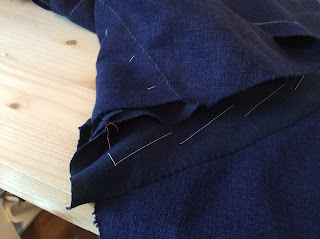
Here you can see that I've just sewn down to the point but not through it to the end of the piece. This will help later as I press and turn the placket. 
Once that first step of stitching down the placket is done, turn your work to the inside and stitch down the Fall lining through the crotch. I turn under a 1/4" fold, pin, and then stitch with a little felling stitch again. Use a small needle, a single thread, and make your stitches about 1/8-1/4" long, picking up just the fold of the lining when you come through to this side. You can feel with your finger on the underside how big your stitches are. Small and even is key.
Here is the inside stitched down, and the crotch folded up so you can see the stitches on the outside. You 'could' machine this, if you're working on a pair for theatre, but for living history, take the couple of minutes extra and do this by hand. Trust me, you'll appreciate it later when you are trying to meet dress regs for your unit.
Here is when I slash into the fronts to make the Fall actually 'Fall'. The slash is straight, following my seam line and only going as far as the end of the seam for the placket, no further.
Now is where I deal with the Placket. Turn down the top edge and press, turn up the first part of the point, nearest the seam, and press, press up the remaining point and across the bottom edge. Then press the placket away from the front Fall.
Turn your work to the inside, and press the placket in place, folding and pressing that last long edge. Pin everything in place. I start sewing the top edge of the placket together, then down the long inside edge, then the bottom flat edge to the point. Stop there. You don't want to sew the point to the breeches front until you get the next steps done.
Using the slash as a guide, I now cut the front flaps that hang out inside the Fall. They are sometimes quarter circles, sometimes they are highly shaped little dudes. For our purposes, I'm just cutting quarter circles. you can see on the quarter circle above, my line for the slash. I've given myself a full inch seam allowance, which I will break up between the top and bottom edge as needed. Better to be a bit big, than too small in this instance.
Using a 1/2" seam allowance, I've sewn the outside curve of the quarter circle. Don't forget to anchor your stitching, in my case, with machine, I'm just using a backstitch. If by hand, don't forget to knot your thread!
Once the seam is sewn, you will want to grade your seam allowances, or this curve will never lay flat. I'm NOT a fan of clipping, as it doesn't take care of the bulk, and leaves you with a whole lot of cut stress points just begging to tear open and make a mess. Grade by cutting one seam allowance at a time, the first go 1/8" from the seam, holding your scissors flat like they are in the photo...my hand isn't there because it's taking a photo, but you get the drift. The next seam allowance is cut slightly wider, and you can hold your scissors upright, like normal.
You may hate me by the end of this, but really, I am showing you some inside tricks to make things easier. Basting again...invest in some cheap white poly cotton thread, you'll use it a lot with me.
I'm turning these quarter circles now to the right side and pressing them. To get the seam to lay right on the edge, roll the seam between your thumb and forefinger until it's right on the edge and then baste. Each stitch, I roll, and baste, roll and baste, roll and baste, until the whole seam is lovely. This photo shows the quarter circles as they will sit on the body, it also gives you an idea of what the front and back of the diagonal basting stitch looks like, little horizontal stitches on the back, long diagonal on the top. Then Press!
Pressing and basting are key to making lovely clothes. I've run out of photos, so I'm back to sewing...and more coffee. Some seamsters run on tea, I run on coffee.
|
 Baste down the Centre Front (CF) seam, then the outside edges.


No comments:
Post a Comment